The City Portal Web Application sample with UB 5 #
Welcome to your first Unity Base tutorial!
In this chapter, you will learn how to create the simplest UB application on the example of a city portal site.
We will continue exploring new features and possibilities of the UB platform in the following chapters.
The content of the full course could be found under this link.
Our City Portal sample demonstrates accounting of citizens request on city departments.
By constructing a website for a fictional city portal based on this tutorial, you will be able to create, read, update and delete (CRUD) different objects.
Let’s start the practice.
Prerequisites #
-
Install UnityBase
Windows
For working with the console we recommend to install ConEmu and Far Manager
Install UnityBase and configure the environment:
Download UnityBase
Also you must add path to ub.exe to PATH in environment variables.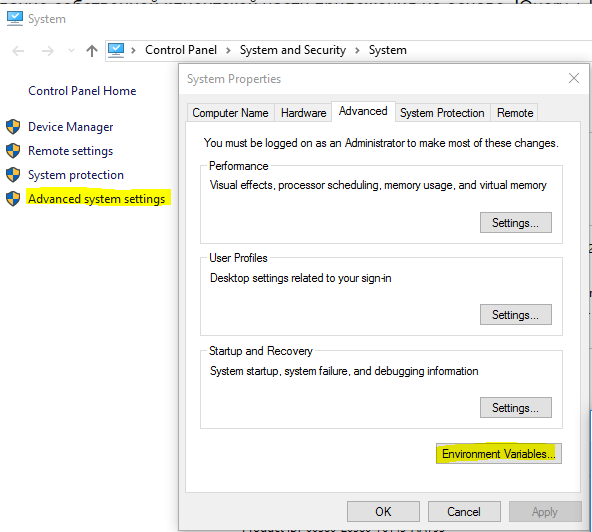
Linux
For working with the console we recommend to install Midnight Commander
Install UnityBase as Debian Software Package file:
Download UnityBase
or run the following command in a terminalsudo dpkg -i ./ub-server.deb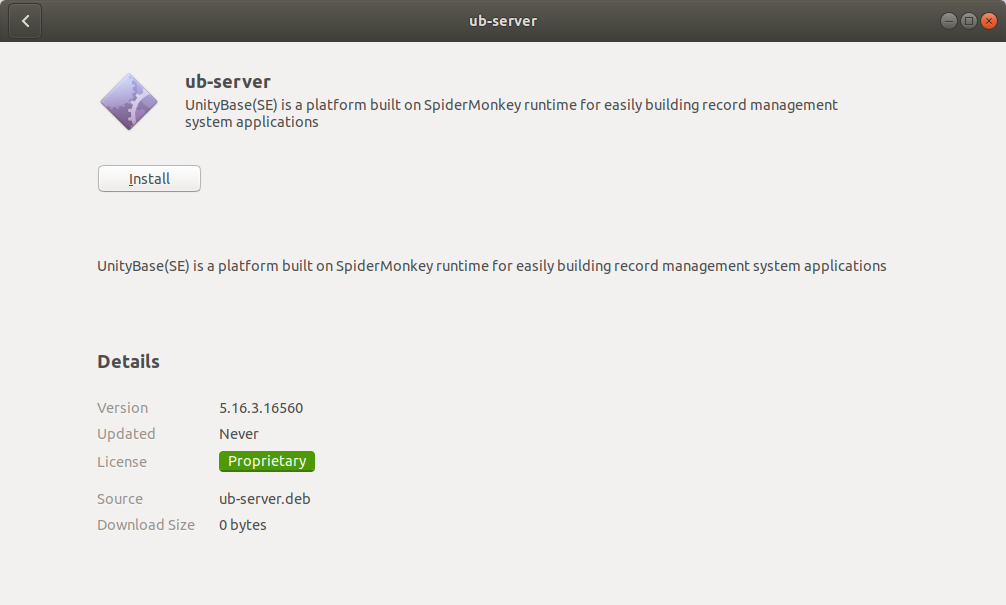
-
Download and install
node.js&npm -
Create the directory
ubProject\CityPortal\
Where the:ubProjectis the root folder for all projectsCityPortalis the name of this project
-
In root of project create the file
cityPortal.jswith the code
const UB = require('@unitybase/ub')
UB.start()
This is initial point of your app
- Initialize your project with Node Package Manager in a root of the project
ubProject\CityPortal\with command
npm init
This utility will walk you through the process of creating a package.json file. You may press Enter for all steps.
File package.json should contain next content:
{
  "name": "cityportal",
  "version": "1.0.0",
  "description": "",
  "main": "cityPortal.js",
  "scripts": {
    "test": "echo \"Error: no test specified\" && exit 1"
  },
  "author": "",
  "license": "ISC"
}
- In root of project create the file
.npmrcwith the code. This file needed to npm see packages start with@unitybase
; Set a registry for a UnityBase scope
@unitybase:registry=https://registry.unitybase.info/
- Install UnityBase command line tools (command
iis alias forinstall)
npm i @unitybase/ubcli @unitybase/ub-migrate
under Windows to execute
ubclicommand in the project folder either typenpx ubcli ....or add a path toubcli.cmdinto PATH variable
- Install next packages. This packages contains UB models and other functionality for your project.
npm i @unitybase/ub @unitybase/adminui-reg @unitybase/ubq @unitybase/adminui-pub @unitybase/adminui-vue
-
Create the
modelsandrequestsdirectories in a way to get:\ubProject\CityPortal\models\requests -
In the
CityPortaldirectory create a folder for storing log fileslogs
Create a model #
UnityBase applications are built on the principle of Model-driven engineering (MDE) - a software development methodology which focuses on creating and exploiting domain models which are conceptual models of all the topics related to a specific problem. In most of enterprise systems, the large-scale areas of responsibility are used. In UnityBase this level of abstraction is called models.
All models should consist of entities.
Our model will consist of three entities: Departments, SubDepartments, and Request List.
Let's create them.
[+ ❗ Every entity has a mandatory section called Mixin. Don’t forget to add it, you may leave it empty though. +]
Press here to get more details about the entity schema.
- The Departments Entity
Create a file \ubProject\CityPortal\models\requests\req_depart.meta, with the following code:
{
 "caption": "department",
 "description": "department",
 "descriptionAttribute": "name",
 "attributes": [
    {
     "name": "name",
     "dataType": "String",
     "size": 255,
     "caption": "Name",
     "description": "Department Name",
     "allowNull": false,
     "isUnique" : true
   },
    {
     "name": "postAddr",
     "dataType": "String",
     "size": 255,
     "caption": "Address",
     "description": "Department Address",
     "allowNull": false
   },
   {
     "name": "phoneNum",
     "dataType": "String",
     "size": 255,
     "caption": "Phone",
     "description": "Department Phone",
     "allowNull": false
   }
],
 "mixins": {
  "mStorage": {
  }
 }
}
- The SubDepartments Entity
Create a file \ubProject\CityPortal\models\requests\req_subDepart.meta, with the following code:
{
 "caption": "subDepartment",
 "description": "subDepartment",
 "descriptionAttribute": "name",
 "attributes": [
   {
     "name": "name",
     "dataType": "String",
     "size": 255,
     "caption": "Name",
     "description": "Department Name",
     "allowNull": false,
     "isMultiLang": false
   },
   {
     "name": "department",
     "dataType": "Entity",
     "associatedEntity": "req_depart",
     "caption": "department",
     "allowNull": false
    }
 ],
 "mixins": {
  "mStorage": {
          }
 }
}
- The Request List Entity
Create a file \ubProject\CityPortal\models\requests\req_reqList.meta with the following code:
{
 "caption": "request",
 "description": "request",
 "sqlAlias": "req",
 "attributes": [
   {
     "name": "reqDate",
     "dataType": "Date",
     "caption": "Request Date",
     "description": "Request Date",
     "allowNull": false
   },
   {
     "name": "applicantPhone",
     "dataType": "String",
     "size": 255,
     "caption": "Phone",
     "description": "Applicant`s phone",
     "allowNull": false
   },
   {
     "name": "applicantInfo",
     "dataType": "String",
     "size": 255,
     "caption": "Contact info",
     "description": "Applicant`s contact info",
     "allowNull": false
   },
   {
     "name": "department",
     "dataType": "Entity",
     "associatedEntity": "req_depart",
     "caption": "Department",
     "allowNull": false
   },
   {
     "name": "subDepartment",
     "dataType": "Entity",
     "associatedEntity": "req_subDepart",
     "caption": "SubDepartment"
   },
   {
     "name": "reqText",
     "dataType": "Text",
     "size": 2500,
     "caption": "Text of Request",
     "description": "Text of request",
     "allowNull": false
   } ,
   {
    "name": "reqDoc",
    "dataType": "Document",
    "caption":"attach",
    "description" :"doc",
    "storeName": "attach"
    },
    {
      "name": "answer",
      "dataType": "Text",
      "size": 2500,
      "caption": "Request answer",
      "description": "Request answer",
      "allowNull": true,
      "isMultiLang": false
    }

],
 "mixins": {
  "mStorage": {
  }
 }
}
UB5 server does not automatically load ANY *.js files except one specified in main section of application package.json, so
create in models/requests file req.js with code
const UB = require('@unitybase/ub')
And init them in package.json In current folder run command
npm init
With following parametres
{
  "name": "requests",
  "version": "1.0.0",
  "description": "",
  "main": "req.js",
  "scripts": {
    "test": "echo \"Error: no test specified\" && exit 1"
  },
  "author": "",
  "license": "ISC"
}
Add next section in package.json after main
  "config": {
    "ubmodel": {
      "name": "requests"
    }
  },
UnityBase Server Configuration #
The configuration file ubConfig.json in root of project \ubProject\CityPortal should consist of following mandatory blocks:
httpServer (Built-in HTTP server configuration)
logging (Logging configuration)
application (Business logic configuration)
connections (Database connections)
blobStores (Database connections definition for application)
uiSettings (Settings, passed to UI in getAppInfo method)
Follow this link to get more details.
If values of the following properties: "serverType", "protocol", "host", "port" are not defined they take defaults values.
{
  "httpServer": {
    // Built-in HTTP server configuration
    "host": "+",
    // Host name for server. +' will bound to all domain names for the specified port
    "port": "8881"
    //port to listen on
  },
  "logging": {
    //Logging configuration
    "levels": [
      // Type of events to put to log file. If * all types of errors
      "*"
    ],
    "path": "./logs"
    //Path to folder where server place flog files (including rotated logs)
  },
  "security": {
    //List of supported authentication methods
    "authenticationMethods": [
      "UB"
    ]
    //can be used as default method
  },
  "application": {
    //Business logic configuration
    "defaultLang": "en",
    "domain": {
      //Domain models. Loaded in the order in which they appear in this array
      "models": [
        // list of models which should be loaded
        {
          "path": "./node_modules/@unitybase/ub"
        },
        {
          "path": "./node_modules/@unitybase/uba"
        },
        {
          "path": "./node_modules/@unitybase/ubs"
        },
        {
          "path": "./node_modules/@unitybase/ubm"
        },
        {
          "path": "./node_modules/@unitybase/ub-pub"
        },
        {
          "path": "./node_modules/@unitybase/adminui-pub"
        },
        {
          "path": "./node_modules/@unitybase/adminui-reg"
        },
        {
          "path": "./node_modules/@unitybase/adminui-vue"
        },
        {
          //Path to the our created model
          "path": "./models/requests"
        }
      ]
    },
    "connections": [
      // Here define the database connections
      {
        //Unique connection name,
        "name": "main",
        //Is this connection is default for application ,
        "isDefault": true,
        //Database driver used for connection       ,
        "driver": "SQLite3",
        //Database dialect,
        "dialect": "SQLite3",
        // Name of the database,
        "databaseName": "./mainDB.db",
        //Array of supported locales,
        "supportLang": [
          "en"
        ]
      }
    ],
    "blobStores": [
      {
        // Unique blobStore name.,
        "name": "avatars",
        // todo,
        "tempPath": "./avatars/_temp",
        // The path to store root folder,
        "path": "./avatars",
        // Approximate number of files to store. Simple = up to    10000,
        "storeSize": "Simple",
        //Is this store default for application,
        "isDefault": true
      },
      {
        // Unique blobStore name.,
        "name": "attach",
        // The path to store root folder,
        "path": "./docs/attach/",
        // Approximate number of files to store. Simple = up to    10000,
        "storeSize": "Medium",
        //Is this store default for application,
        "isDefault": false,
        "historyDepth": 2
      },
      {
        "name": "mdb",
        "tempPath": "./avatars/_temp",
        "storeType": "Virtual"
      }
    ]
  },
  "uiSettings": {
    "adminUI": {
      //Settings for admin UI
      "endpoint": "adm",
      //Name of application for show on the login form,
      "applicationName": "City Portal",
      //Title of HTML page for adminUI,
      "applicationTitle": "Requests",
      //For development purpose only,
      "defaultPasswordForDebugOnly": "admin"
    }
  }
}
Windows users need one more step:
Modify registration of server's URI in http.sys table using current config and add registration entry for server's URI to http.sys registration table.
Run with admin rights:
ub -http register http://localhost:8881
Create the Database #
The entity’s data is stored in database tables. Thus, at this stage, you’ll create the database structure. In order to successfully complete this task, you need to follow trough few steps.
First, you should go to the current project root \ubProject\CityPortal
Now you'll generate the Database. The process of requesting the data will automatically trigger the creation.
Create Store #
Create folders for storing files in the filesystem:
ubcli createStore
initDB #
Create a new database (schema) and a minimal set of DB object for UnityBase:
ubcli initDB -p admin -drop -create -host http://localhost:8881
❗ Value passed to parameter -p become a password for build-in admin user.
All the commands below should also use it as the value of the parameter -p.
❗ In case your database is Postgres/Oracle you should
pass a dba credentials to ubcli command to create/drop a database as such:
ubcli initDB -p admin -dba DBA_USER_NAME -dbaPwd DBA_PASSWORD -drop -create -host http://localhost:8881
❗ In case of instantiating UB in the existed schema (database for MS SQL) -drop -create parameters must be omitted
ubcli initDB -p admin -dba DBA_USER_NAME -dbaPwd DBA_PASSWORD -host http://localhost:8881
generateDDL #
Create a data definition statements for database tables:
ubcli generateDDL -u admin -p admin -host http://localhost:8881 -autorun
initialize #
Initializing DB. Filling up domain entities by its initial values.
ubcli initialize -u admin -p admin -host http://localhost:8881
Short call for all three previously described generation commands #
You can create a short call for all three previously described generation commands. Just create the init.cmd for Windows or init.sh for Linux, put into the following code
init.cmd
set UB_HOST=http://localhost:8881
set UB_USER=admin
set UB_PWD=admin
call ubcli initDB -drop -create
@if errorlevel 1 goto err
call ubcli generateDDL -autorun
@if errorlevel 1 goto err
call ubcli initialize
@goto eof

:err
echo Something wrong
exit 1

:eof
init.sh
#!/usr/bin/env bash
echo '---initDB---' &&
ubcli initDB -p admin -drop -create &&  # -dba postgres -dbaPwd postgres # for postgres
echo '---generateDDL---' &&
ubcli generateDDL -u admin -p admin -autorun &&
echo '---initialize---' &&
ubcli initialize -u admin -p admin
and save it in the project folder ubProject\CityPortal
Start a Server #
In order to start a server, call the ub from the root of the project
\ubProject\CityPortal>ub
Debug ub server with VSCode #
You can debug ub server version >= 5.11 (ub -v) with VSCode.
Version 2.4.0 of "Debugger For FireFox" extension MUST be used
Install "Debugger For FireFox" extension for VSCode #
From command line (recommended):
code --install-extension firefox-devtools.vscode-firefox-debug@2.4.0
Form VSCode IDE:
- Press
Ctrl+Shift+XtypeFirefoxand select extensionDebugger For FireFox - Press "Install"
- From the installed extension panel press Manage gear button and select "Install another version"
- type 2.4.0 and wait until version found (may be up to 5 minutes)
- select 2.4.0 version
Create a Launch configuration #
{
    "version": "0.2.0",
    "configurations": [
        {
            "type": "firefox",
            "request": "attach",
            "name": "UB",
            "host": "127.0.0.1",
            "port": 6000,
            "sourceMaps": "client"
        }
    ]
}
Adding a manifest #
Since UB can run multiple JS Engine, we need to add a configuration with an engine name we want to debug.
Place the new manifest.json file at the folder specified in addonPath above (practically - close to the package.json file).
It should contain the following content:
{
    "applications": {
        "gecko": {
            "id": "Server"
        }
    }
}
Possible values of the "id" property above are:
- "id": "Server" to debug a server-side thread (This what you need in most cases)
- "id": "client" to debug a console thread (command line js executed by >ub myscript.js -dev - debug)
- "id": "WebSocket" to debug a server-side WebSocket thread
Run ub in developer mode #
!!! Please, disable a WebSocket (comment a wsServer section in ubConfig.json) before debugging - debugging with enabled WebSockets don't work yet
Run UB in developer mode to allow debugger
ub -cd -dev
Start debugging in VSCode #
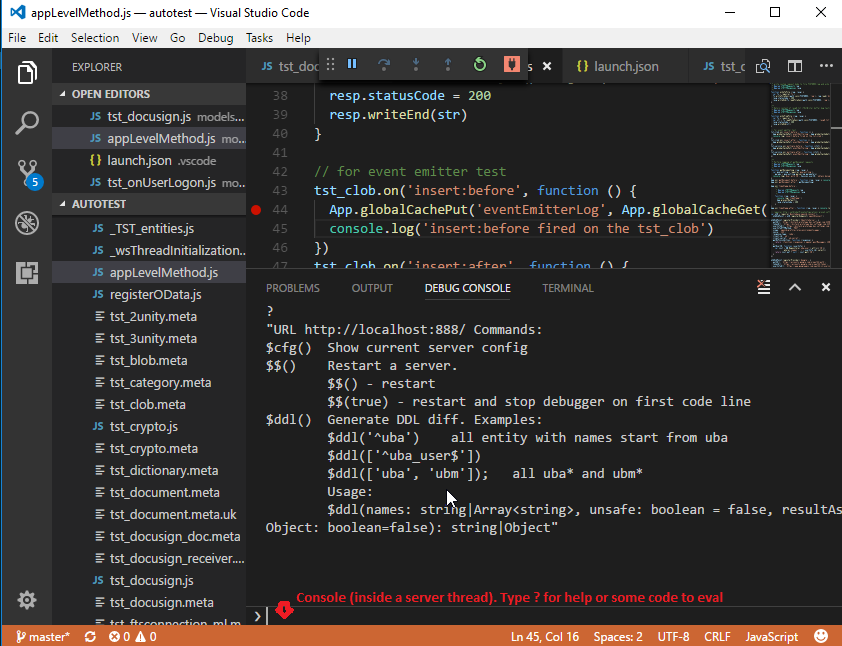
In VS Code press F5 to connect to a UB Remote Debugger.
In case you got a error This debugger currently requires add-ons to specify an ID in their manifest - see [Adding a manifest] section above.
You can set a breakpoints in IDE before start a debugger or during debugging.
Read debugging manual #
Debugging tips #
You can modify a sources you debug, but this changes are applied to server only after restart.
You can restart a server directly from debugging console by typing $$() command - see picture
Debug a Server with Firefox #
For better experience use Debug ub server with VSCode
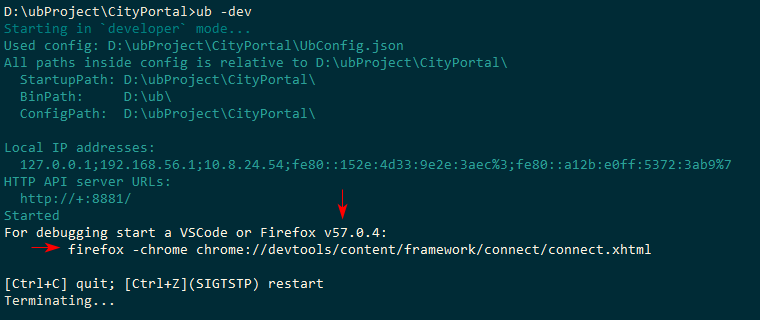
Run UnityBase server in the developer mode by using key -dev(with SHIFT + Enter)
\ubProject\CityPortal>ub -dev
Next, you must install same version Firefox, as ub tell.
Download installer here.
Don't forget to turn off autoupdating to last version.
After install add to target field in shortcut properties or execute in console next line:
firefox -chrome chrome://devtools/content/framework/connect/connect.xhtml

After execute shortcut, press Connect, then Server
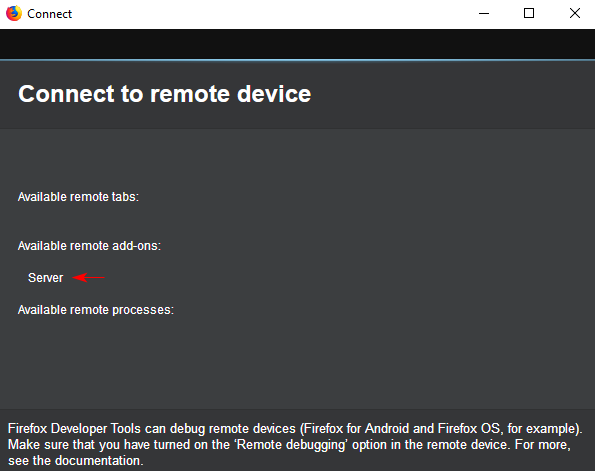
Now you can search files, put breakpoints and etc.
Working with AdminUI #
Now we can start working with Front-End AdminUI.
AdminUI is a Rich Internet application, designed to create a desktop-like user interface. It allows creating intranet Web application with auto generation/declarative description of UI. All UI elements are based on Domain model and often are generated automatically. Thus, it’s enough to define entity on the server side.
Since we’ve previously configured our adminUI endpoint to http://localhost:8881/adm , just follow this link.
While the initDB command is executed, the user with admin/admin as a login/password pair is created by default. You can change your password using profile menu in the top-right corner of AdminUI. Thus, at the beginning, you log in under admin/admin.
Usually, enterprise application has many menu items (shortcuts). We recommend grouping our entities into the desktops. Each desktop has its own stack of commands. We’ll configure the desktop CityPortal and add shortcuts to display the students’ environment and course data so we can use CRUD operations on them.
New Desktop #
Let’s create a new “CityPortal” desktop for our system.
[+ ❗ You must have logged under admin account +]
- Go to UI menu and select Desktops menu
- Click on Add (Ctrl+ins)
- Fill mandatory fields
- Check By default? checkbox so a CityPortal desktop will be set to default.
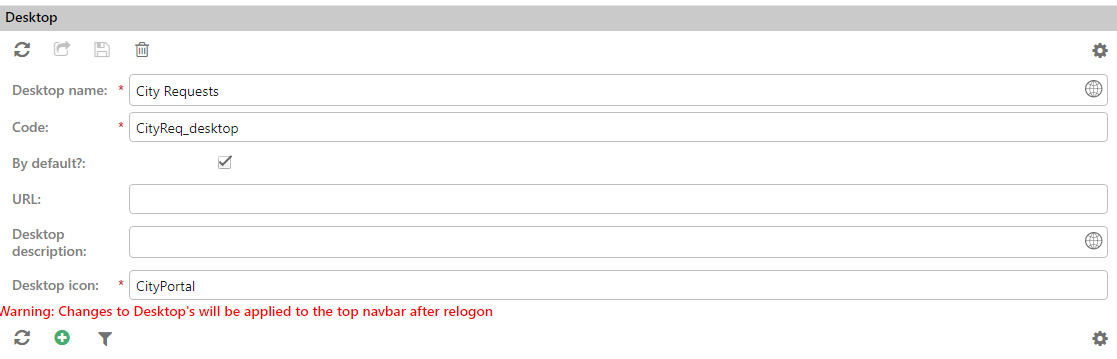
-
Click on Save and close (Ctrl + enter)
The new desktop should appear on adminUI navigation bar (or press F5).
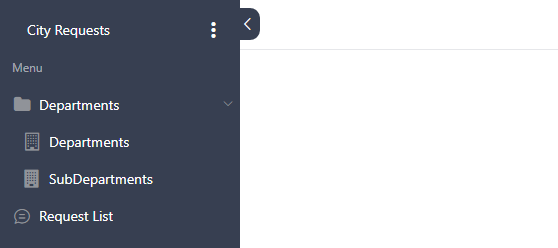
We’ve created a desktop, but there’re still no entities in it. So now we’ll add Departments, SubDepartments and RequestList shortcuts to the “CityPortal” desktop to obtain a result shown below.
Create a navigation shortcut #
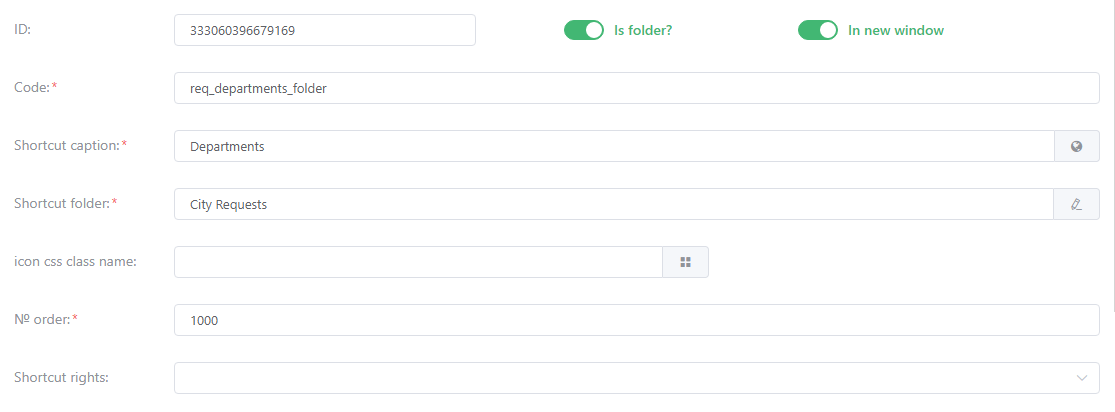
Let’s start with the folder for Departments shortcuts.
Do the following steps:
- Go to
Administrator>UI>Shortcuts - Click on Add (Ctrl+ins)
- Fill up the following fields:
- “Desktop”: Choose the name of the created desktop in previous steps
- “Shortcuts caption”: add the Departments name
- “Code”: add the req_departments_folder (the same as models name)
- Check Is folder?
- Click on Save and close (Ctrl + enter)
Add shortcut for "Departments" entity. #
Do the following steps:
- Go to
Administrator>UI>Shortcuts - Click on Add (Ctrl+ins)
- Fill up the following fields:
- “Desktop”: Choose the the name of the created desktop in previous steps
- “Shortcuts folder”: add the Departments name
- “Shortcuts caption”: add the Departments name
- “Code”: add the req_depart (the same as models name)
- “Icon css class name”: fa fa-building-o
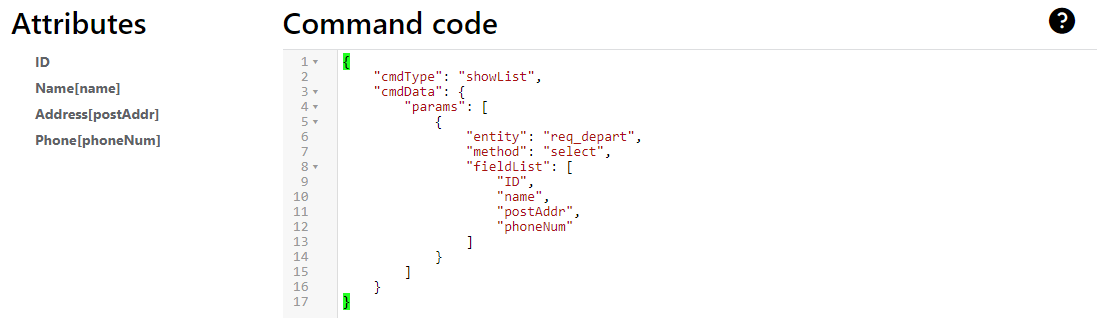
- Enter following code into the code place
{
    "cmdType": "showList",
    "cmdData": {
        "params": [
            {
                "entity": "req_depart",
                "method": "select",
                "fieldList": [
                    "ID",
                    "name",
                    "postAddr",
                    "phoneNum"
                ]
            }
        ]
    }
}
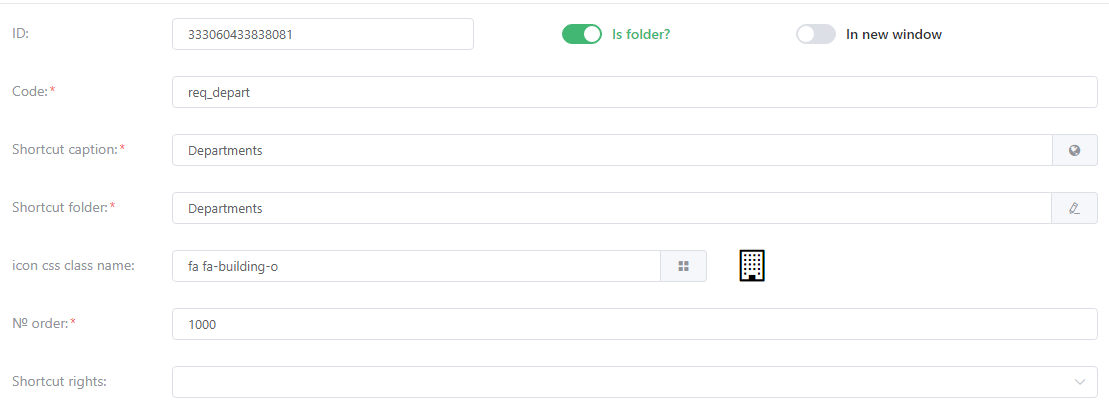
- Click on Save and close (Ctrl + enter)
- Go to the CityPortal desktop
- Click on Departments menu item so the Department's form could be opened
- Click on Add (Ctrl+ins). As a result, you should get a “Department” edit form shown on the following picture.
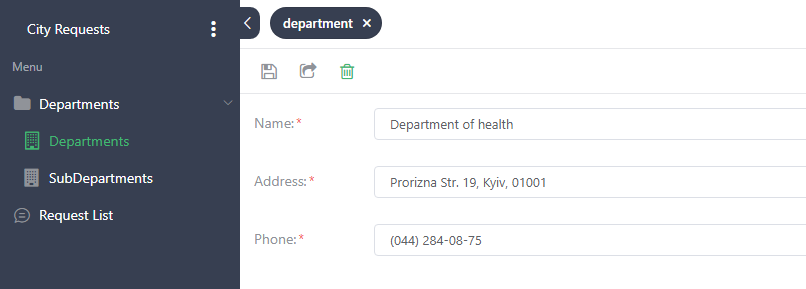
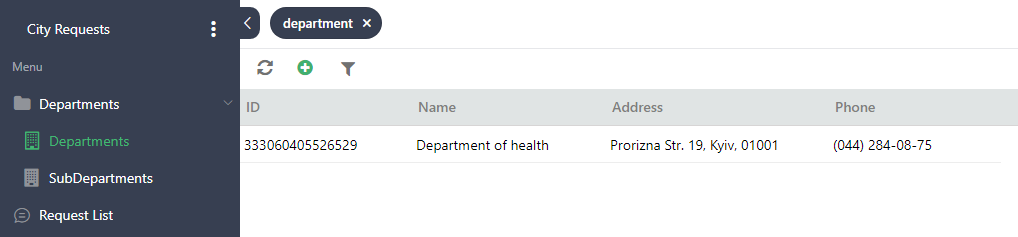
- Click on Save and close (Ctrl + enter). The following picture demonstrates what you’ll get as a result.
Add SubDepartments and Request List shortcuts in the same way.
If you did all the previous steps correctly, you’ll see the shortcuts at CityPortal desktop as pictured above.
Under the Hood #
Previously we have described the entities for CityPortal application. UnityBase platform made the following actions:
- Created the database in the triple form taking all the required indexes and constraints into account.
- The script for a database creation was generated into main_0.sql file.
- Generated user interface based on entities’ metadata.
Mixin mStorage has added the methods select, insert, update & delete for basic operation to entities.
Model UBA connected to the list of models (in the configuration file) has added to our
application everything that is necessary for building a security layer:
authorization and authentication. security section of the configuration file
"security":{
   "authenticationMethods": ["UB"]
 }
Authorization tools integrated within the platform are resistant to most attack types including Men-in-the-middle (MIT) & Replay attack.
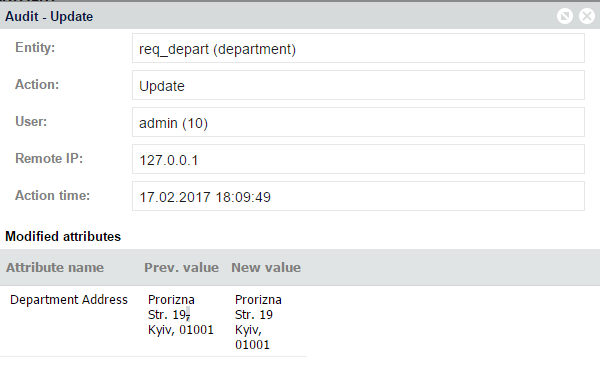
Automatic change audit:
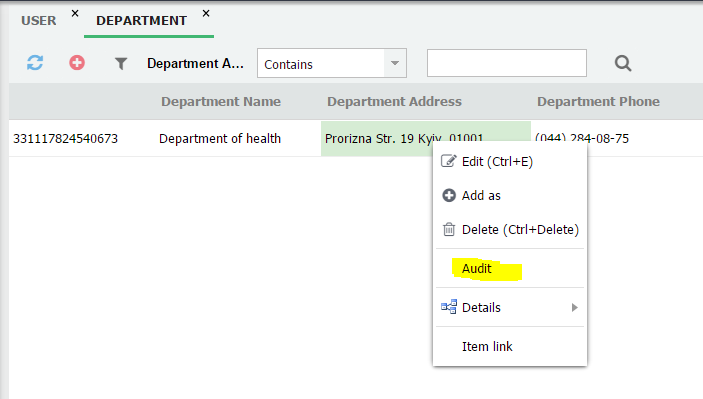
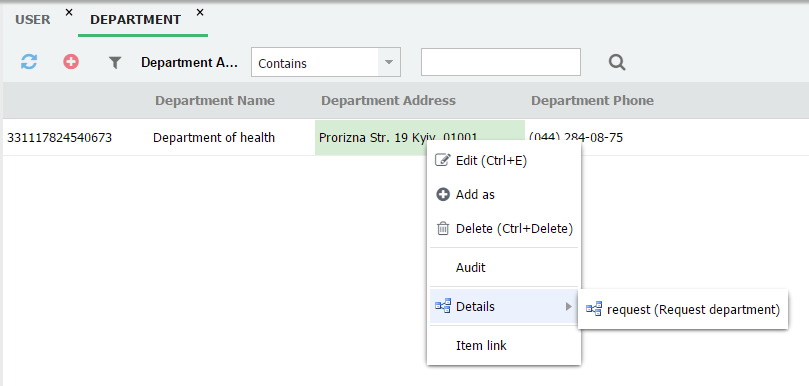
The system is monitoring the connections between the objects in accordance with metadata which, as an example, allows to introduce data as Master->Detail
Server provides the external applications with API in accordance with metadata. For example, the system’s administrative interface works using the server’s API.
The application created by us is production ready and can bring its services to tens of thousands of system’s users.
We’ll analyze a creation of complex UI forms, portal solutions and tools of access control related to data in accordance with user’s roles in our next tutorials.