Creating your own web-page based on JQuery + UB Server #
This charter of the tutorial demonstrates how to create the client-side part for your application using JQuery + Bootstrap and how to establish its connection with the UB server.
Our application will:
- have an authorization form
- display the list of applications that are available for the current user
- allow the user to edit responses from applications
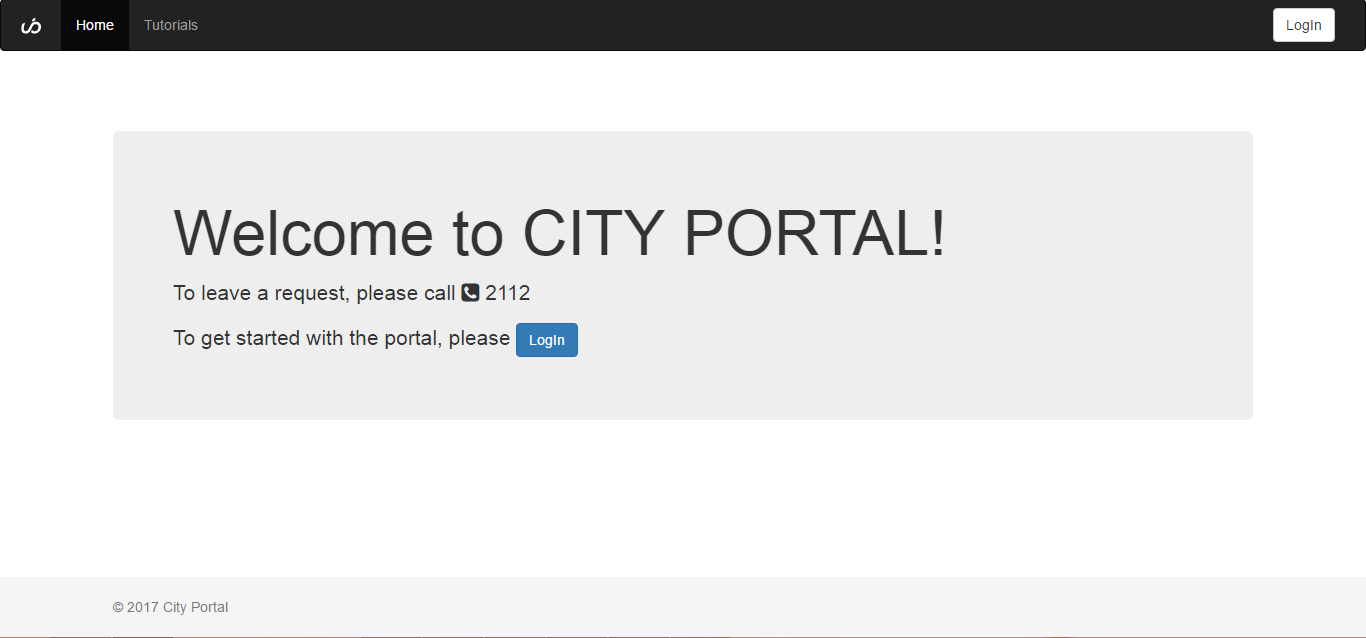
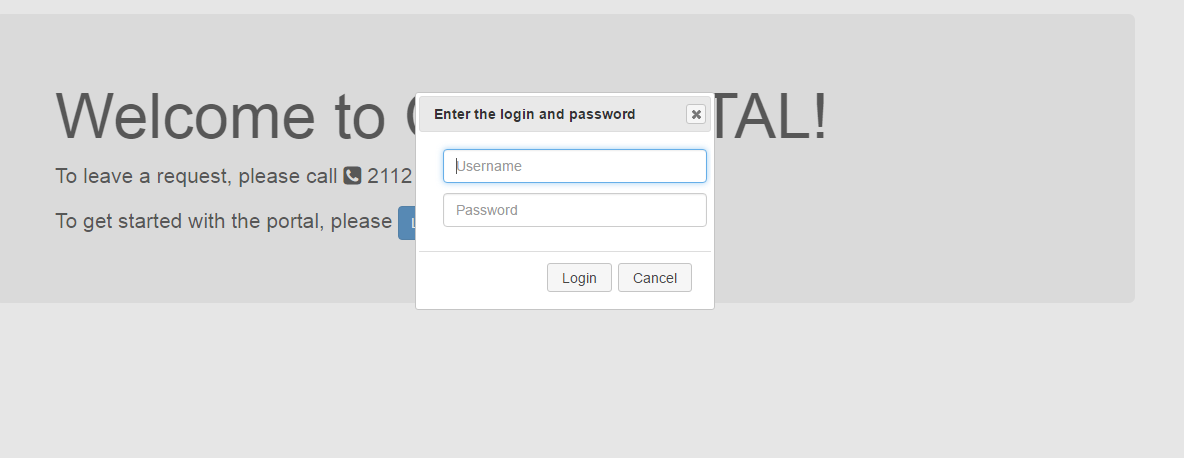
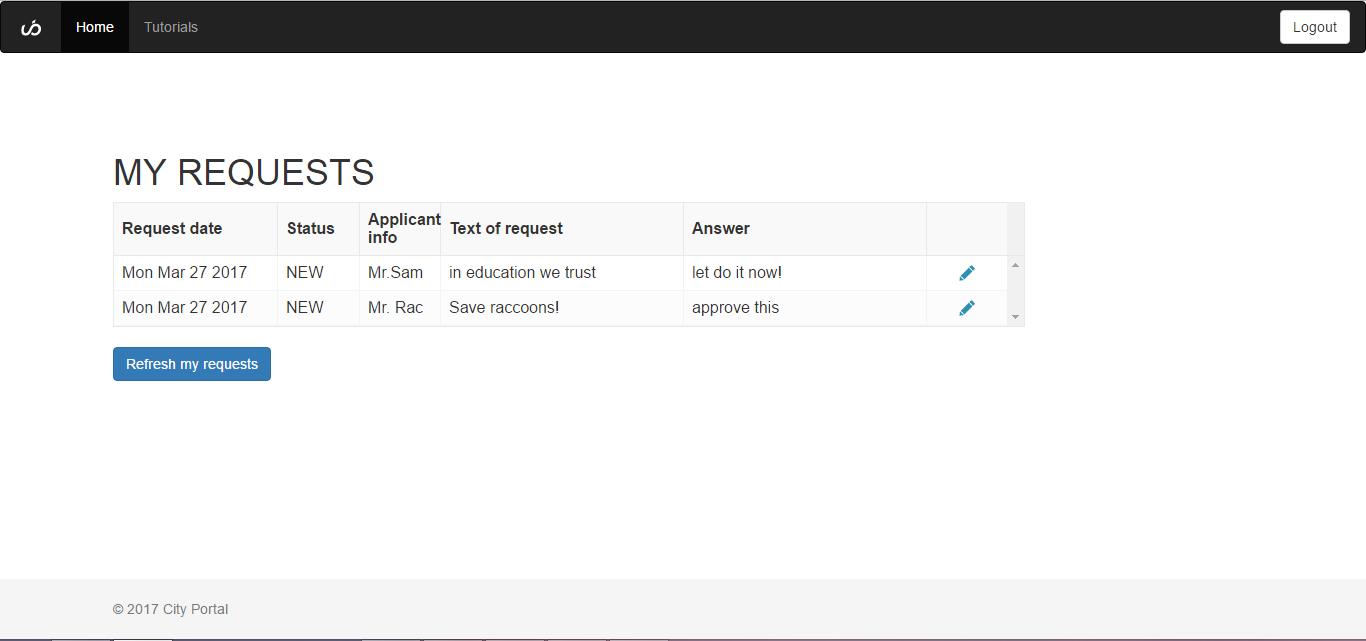
Let's look at how our future app will look.
The Welcome page:
The Authorization form:
The list of requests to user:
Creating the web-page using a single HTML file #
To create the web-page using a single HTML file you need to go through the following steps:
- Prepare the project structure
- Add the necessary scripts
- Describe the page view using Bootstrap
- Describe buttons functionality
- Establish a connection to UB server
- Describe authorization functionality
- Describe the data loading from the UB server
Prepare the project structure #
- Create a
wwwsubdirectory in the project folder - Create
index.htmlin it - Add the
"inetPub"property to the"httpServer"section inubConfig.jsonwith a link to the directory where the HTML-code is stored:
{
    "httpServer": {         // Built-in HTTP server configuration
        "host": "+",        // Host name for server. '+' will bound to all domain names for the specified port
        "port": "8881",     // port to listen on
        "inetPub": "./www"
    },
}
Add the necessary scripts #
In the index.html file,
- Add a link to the
lodashmodule:
<script src="https://cdnjs.cloudflare.com/ajax/libs/lodash.js/4.17.11/lodash.min.js"></script>
- Add a link to the
ubmodule:
<script src="/clientRequire/@unitybase/ub-pub/dist/ub-pub.min.js"></script>
- Connect the necessary styles and scripts to work with Bootstrap and jquery-UI styles:
  <link rel="stylesheet" href="https://stackpath.bootstrapcdn.com/bootstrap/4.1.3/css/bootstrap.min.css"
        integrity="sha384-MCw98/SFnGE8fJT3GXwEOngsV7Zt27NXFoaoApmYm81iuXoPkFOJwJ8ERdknLPMO" crossorigin="anonymous">
  <link rel="stylesheet"
        href="http://getbootstrap.com/docs/4.1/examples/sticky-footer-navbar/sticky-footer-navbar.css">
  <link rel="stylesheet" href="https://use.fontawesome.com/releases/v5.3.1/css/all.css"
        integrity="sha384-mzrmE5qonljUremFsqc01SB46JvROS7bZs3IO2EmfFsd15uHvIt+Y8vEf7N7fWAU" crossorigin="anonymous">
  <link rel="stylesheet" href="https://code.jquery.com/ui/1.12.1/themes/base/jquery-ui.css">
  <script
          src="https://code.jquery.com/jquery-3.3.1.min.js"
          integrity="sha256-FgpCb/KJQlLNfOu91ta32o/NMZxltwRo8QtmkMRdAu8="
          crossorigin="anonymous"></script>
  <script
          src="https://code.jquery.com/ui/1.12.1/jquery-ui.min.js"
          integrity="sha256-VazP97ZCwtekAsvgPBSUwPFKdrwD3unUfSGVYrahUqU="
          crossorigin="anonymous"></script>
- Add styles and scripts for the JSGrid plug-in:
  <link type="text/css" rel="stylesheet" href="https://cdnjs.cloudflare.com/ajax/libs/jsgrid/1.5.3/jsgrid.min.css"/>
  <link type="text/css" rel="stylesheet"
        href="https://cdnjs.cloudflare.com/ajax/libs/jsgrid/1.5.3/jsgrid-theme.min.css"/>
  <script type="text/javascript" src="https://cdnjs.cloudflare.com/ajax/libs/jsgrid/1.5.3/jsgrid.min.js"></script>
Describe the page view using Bootstrap #
Create the body section for the index.html file
as follows:
<body>

<header>
    <!-- Fixed navbar -->
    <nav class="navbar navbar-expand-md navbar-dark fixed-top bg-dark">
        <a class="navbar-brand" href="https://unitybase.info/">
            <img alt="Brand" src="https://unitybase.info/img/logo.svg" height="30">
        </a>
        <button class="navbar-toggler" type="button" data-toggle="collapse" data-target="#navbarCollapse"
                aria-controls="navbarCollapse" aria-expanded="false" aria-label="Toggle navigation">
            <span class="navbar-toggler-icon"></span>
        </button>
        <div class="collapse navbar-collapse" id="navbarCollapse">
            <ul class="navbar-nav mr-auto">
                <li class="nav-item active">
                    <a class="nav-link" href="#">Home <span class="sr-only">(current)</span></a>
                </li>
                <li class="nav-item">
                    <a class="nav-link"
                       href="https://git-pub.intecracy.com/unitybase/samples/tree/master/courses/tutorial-v5">Tutorials</a>
                </li>
            </ul>
            <button type="button" class="btn btn-default navbar-btn navbar-right" style="display: none;"
                    id="btn-logout-nav">Logout
            </button>
            <button type="button" class="btn btn-default navbar-btn navbar-right" id="btn-login-nav">LogIn</button>
        </div>
    </nav>
</header>

<!-- Begin page content -->
<main role="main" class="container theme-showcase">
    <div class="jumbotron" id="welcome-container">
        <h1>Welcome to CITY PORTAL!</h1>
        <p>To leave a request, please call <i class="fa fa-phone-square" aria-hidden="true"></i> 2112</p>
        <p>To get started with the portal, please
            <button type="button" class="btn btn-primary" id="btn-login-j">LogIn</button>
        </p>
    </div>
    <div id='requests-container' style="display: none;">
        <h1>MY REQUESTS</h1>
        <div id="jsGrid" style="margin-bottom: 20px"></div>
        <button type="button" class="btn btn-primary" id="btn-get-req">Refresh my requests</button>
    </div>
</main>

<div id='popUp' title="Enter the login and password"></div>
<div id='errDialog' title="Error"></div>

<footer class="footer">
    <div class="container">
        <span class="text-muted">© 2017 City Portal </span>
    </div>
</footer>

</body>
For more info about Bootstrap, see https://getbootstrap.com/
Describe buttons functionality #
Create the <script></script> section with the following code:
<script>
  $(function() {
    ubAuth()

    $('#btn-login-nav, #btn-login-j').click(function () {
      ubAuth()
    })

    $('#btn-get-req').click(function () {
      getMyRequests()
    })

    $('#btn-logout-nav').click(function () {
      if (window.$conn) window.$conn.logout().then(function () {
        getNonAuthContainers()
      })
    })

    function getAuthContainers () {
      $("#btn-login-nav").css({ "display": "none" });
      $("#btn-logout-nav").css({ "display": "inline" });
      $("#welcome-container").css({ "display": "none" });
      $("#requests-container").css({ "display": "inline" });
    }

    function getNonAuthContainers () {
      $("#btn-login-nav").css({ "display": "inline" });
      $("#btn-logout-nav").css({ "display": "none" });
      $("#welcome-container").addClass("jumbotron").css({ "display": "block" });
      $("#requests-container").css({ "display": "none" });
    }
  }
</script>
Establish a connection to UB server #
Add to the <script></script> section the following:
function ubAuth() {
    UB.connect({
        host: window.location.origin,
        allowSessionPersistent: true,
        onCredentialRequired: function (conn, isRepeat) {
            return isRepeat
                ? Promise.reject(new UB.UBAbortError('invalid password or username'))
                : customConfirm(); //if session non-autorized call customConfirm() function
        },
        onAuthorizationFail: function (reason) {
            $("#errDialog")
                .html('<b>' + reason + '</b>')
                .dialog({
                    resizable: true,
                    modal: true,
                    buttons: {
                        "Retry": function () {
                            $(this).dialog("close");
                            customConfirm();
                        },
                        "Cancel": function () {
                            $(this).dialog("close");
                        }
                    }
                })
        }
    }).then(function (conn) {
        window.$conn = conn
        //Disable popup-window after F5 if session is authorized
        if ($('#popUp').hasClass('ui-dialog-content')) {
            $('#popUp').dialog("close");
        }
        getAuthContainers() //show content for autorized users
        getMyRequests()   //get requests list
    })
}
For more info about the connection to UB server, see the documentation
Describe authorization functionality #
In order to create an authorization pop-up window and authentication verification,
add the following to the <script></script> section:
function customConfirm () {
  return new Promise(function (resolve, reject) {
    $("#popUp")
      .html('<input type="text" class="form-control" placeholder="Username" id="login"  style = "margin: 10px">' +
        '<input type="password" class="form-control" placeholder="Password" id="pwd" style = "margin: 10px">'
      )
      .dialog({
        resizable: true,
        modal: true,
        buttons: {
          "Login": function () {
            $(this).dialog("close");
            resolve({
              authSchema: 'UB',
              login: document.getElementById('login').value,
              password: document.getElementById('pwd').value
            })
          },
          "Cancel": function () {
            $(this).dialog("close");
            reject();
          }
        },
        focus: function () {
          //submit login form with Enter-key in password field
          $('#pwd').keydown(function (eventObject) {
            if (event.keyCode == 13) {
              $('#popUp').dialog("close");
              resolve({
                authSchema: 'UB',
                login: document.getElementById('login').value,
                password: document.getElementById('pwd').value
              })
            }
          });
        },
      })
  })
}
Describe the data loading from the UB server #
The following snip of code demonstrates how to load data from the UB server and how to display it using JSGrid fields.
Add it to the <script></script> section.
//Create custom template MyDateField for Date formatting in jsGrid
var MyDateField = function (config) {
    jsGrid.Field.call(this, config);
};
MyDateField.prototype = new jsGrid.Field({
    itemTemplate: function (value) {
        return new Date(value).toDateString();
    }
})
jsGrid.fields.myDateField = MyDateField;

function objectDiff(original, modified) {
    let diff = {};
    let modifiedKeys = Object.keys(modified)

    for (let i = 0, l = modifiedKeys.length; i < l; i++) {
        let key = modifiedKeys[i];
        if (original[key] !== modified[key])
            diff[key] = modified[key];
    }
    return diff;
}

const REQ_ENTITY = 'req_reqList'
const REQ_ATTRS = ['ID', 'reqDate', 'status', 'applicantInfo', 'reqText', 'answer', 'mi_modifyDate']
function getMyRequests () {
    window.$conn.Repository(REQ_ENTITY).attrs(REQ_ATTRS).select()
        .then(function (data) {
            $("#jsGrid").jsGrid({
                width: "100%",
                paging: true,
                autoload: true,
                editing: true,
                controller: {
                    loadData: function () {
                        return data
                    },
                    updateItem: function(newData) {
                        var d = $.Deferred(); //see documentation https://api.jquery.com/deferred.promise/
                        // To prevent unnecessary data modification we should pass only modified attributes
                        let original = _.find(data, {ID: newData.ID})
                        let diff = objectDiff(original, newData)
                        // add a ID to diff
                        diff.ID = newData.ID
                        // Since we know our entity support optimistic locks - pass a source modification date
                        diff.mi_modifyDate = original.mi_modifyDate
                        // see UBConnection.update documentation at https://unitybase.info/api/ubcore/UBConnection.html#update
                        //return
                        window.$conn.update({
                            entity: REQ_ENTITY,
                            fieldList: REQ_ATTRS,
                            lockType: 'Temp', // pessimistic lock
                            execParams: diff
                        }).then((response) => {
                            //return response
                            let responseAsObject = UB.LocalDataStore.selectResultToArrayOfObjects(response)[0]
                            // TODO - !@#@ js-grid not exit from edit mode
                            // may be it wait for a jQuery promise ?
                            //return $.Deferred().resolve(responseAsObject)
                            d.resolve(responseAsObject)
                        })
                        return d.promise();
                    }
                },
                fields: [
                    {name: "reqDate", type: "myDateField", width: 100, editing: false, title: 'Request date'},
                    {name: "status", type: "text", width: 50, editing: false, title: 'Status'},
                    {name: "applicantInfo", type: "text", width: 50, editing: false, title: 'Applicant info'},
                    {name: "reqText", type: "text", width: 150, editing: false, title: 'Text of request'},
                    {name: "answer", type: "text", width: 150, title: 'Answer'},
                    {
                        type: "control",
                        itemTemplate: function (value, item) {
                            var $result = $([]);
                            return $result.add(this._createEditButton(item));
                        }
                    }
                ]
            });
        })
}
For more info about JSGrid plugin, see http://js-grid.com/docs/
The full code of the web-page can be found here.
Building a project using webpack #
Webpack is a module bundler.
Webpack takes modules with dependencies and generates static files that represent these modules.
In this section we will build the same web-page using Webpack.
To install the webpack run the following command:
npm install webpack webpack-cli
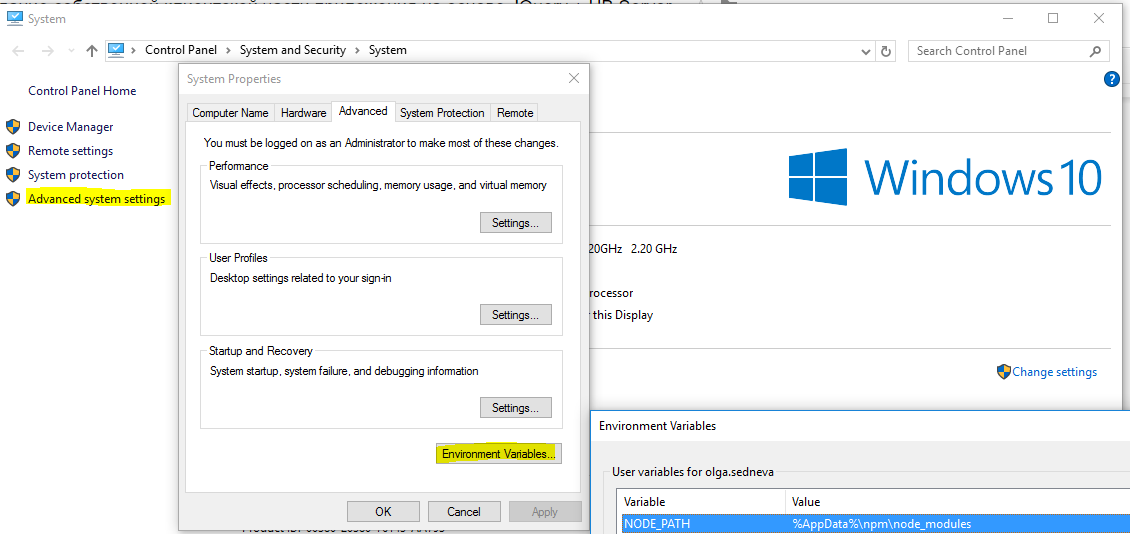
If you have installed the
webpackglobally then you need to set the system variableNODE_PATH.
For Windows users it is looks as follows:
To configure the webpack, create a configuration file in the project root named webpack.config.js
with the following code:
const webpack = require('webpack');
const path = require('path');

module.exports = {
    entry: './www/src/app.js',
    output: {
        path: path.resolve(__dirname, 'www'),
        filename: 'app.min.js'
    },
    module: {
        rules: [
            {test: /\.js$/, exclude: /node_modules/, loader: "babel-loader"}
        ]
    }
}
In this project, the webpack uses the babel-loader and babel's preset-env.
You can read more about loaders here.
To install these packages run the following commands:
npm install --save-dev @babel/core
npm install --save-dev @babel/preset-env
npm install --save-dev babel-loader
In the www folder create the src/app.js file.
Cut the code inside the "main" <script></script> from the index.html file and paste it into the app.js file.
Also, include the ub-pub module:
const UB = require('@unitybase/ub-pub')
The full code of app.js must look like this:
const UB = require('@unitybase/ub-pub')

$(function () {
    ubAuth()

    $('#btn-login-nav').click(function () {
        ubAuth()
    })

    $('#btn-login-j').click(function () {
        ubAuth()
    })

    $('#btn-get-req').click(function () {
        getMyRequests()
    })

    $('#btn-logout-nav').click(function () {
        if (window.$conn) window.$conn.logout().then(function () {
            getNonAuthContainers()
        })
    })


//login with popUp dialog
    function customConfirm() {
        return new Promise(function (resolve, reject) {
            $("#popUp")
                .html('<input type="text" class="form-control" placeholder="Username" id="login"  style = "margin: 10px">' +
                    '<input type="password" class="form-control" placeholder="Password" id="pwd" style = "margin: 10px">'
                )
                .dialog({
                    resizable: true,
                    modal: true,
                    buttons: {
                        "Login": function () {
                            $(this).dialog("close");
                            resolve({
                                authSchema: 'UB',
                                login: document.getElementById('login').value,
                                password: document.getElementById('pwd').value
                            })
                        },
                        "Cancel": function () {
                            $(this).dialog("close");
                            reject();
                        }
                    },
                    focus: function () {
                        //submit login form with Enter-key in password field
                        $('#pwd').keydown(function (eventObject) {
                            if (event.keyCode == 13) {
                                $('#popUp').dialog("close");
                                resolve({
                                    authSchema: 'UB',
                                    login: document.getElementById('login').value,
                                    password: document.getElementById('pwd').value
                                })
                            }
                        });
                    },
                })
        })
    }

//Create custom template MyDateField for Date formatting in jsGrid
    var MyDateField = function (config) {
        jsGrid.Field.call(this, config);
    };
    MyDateField.prototype = new jsGrid.Field({
        itemTemplate: function (value) {
            return new Date(value).toDateString();
        }
    })
    jsGrid.fields.myDateField = MyDateField;

    function objectDiff(original, modified) {
        let diff = {};
        let modifiedKeys = Object.keys(modified)

        for (let i = 0, l = modifiedKeys.length; i < l; i++) {
            let key = modifiedKeys[i];
            if (original[key] !== modified[key])
                diff[key] = modified[key];
        }
        return diff;
    }

    const REQ_ENTITY = 'req_reqList'
    const REQ_ATTRS = ['ID', 'reqDate', 'status', 'applicantInfo', 'reqText', 'answer', 'mi_modifyDate']

    function getMyRequests() {
        window.$conn.Repository(REQ_ENTITY).attrs(REQ_ATTRS).select()
            .then(function (data) {
                $("#jsGrid").jsGrid({
                    width: "100%",
                    paging: true,
                    autoload: true,
                    editing: true,
                    controller: {
                        loadData: function () {
                            return data
                        },
                        updateItem: function (newData) {
                            var d = $.Deferred(); //see documentation https://api.jquery.com/deferred.promise/
                            // To prevent unnecessary data modification we should pass only modified attributes
                            let original = _.find(data, {ID: newData.ID})
                            let diff = objectDiff(original, newData)
                            // add a ID to diff
                            diff.ID = newData.ID
                            // Since we know our entity support optimistic locks - pass a source modification date
                            diff.mi_modifyDate = original.mi_modifyDate
                            // see UBConnection.update documentation at https://unitybase.info/api/ubcore/UBConnection.html#update
                            //return
                            window.$conn.update({
                                entity: REQ_ENTITY,
                                fieldList: REQ_ATTRS,
                                lockType: 'Temp', // pessimistic lock
                                execParams: diff
                            }).then((response) => {
                                //return response
                                let responseAsObject = UB.LocalDataStore.selectResultToArrayOfObjects(response)[0]
                                // TODO - !@#@ js-grid not exit from edit mode
                                // may be it wait for a jQuery promise ?
                                //return $.Deferred().resolve(responseAsObject)
                                d.resolve(responseAsObject)
                            })
                            return d.promise();
                        }
                    },
                    fields: [
                        {name: "reqDate", type: "myDateField", width: 100, editing: false, title: 'Request date'},
                        {name: "status", type: "text", width: 50, editing: false, title: 'Status'},
                        {name: "applicantInfo", type: "text", width: 50, editing: false, title: 'Applicant info'},
                        {name: "reqText", type: "text", width: 150, editing: false, title: 'Text of request'},
                        {name: "answer", type: "text", width: 150, title: 'Answer'},
                        {
                            type: "control",
                            itemTemplate: function (value, item) {
                                var $result = $([]);
                                return $result.add(this._createEditButton(item));
                            }
                        }
                    ]
                });
            })
    }

    function getAuthContainers() {
        $("#btn-login-nav").css({"display": "none"});
        $("#btn-logout-nav").css({"display": "inline"});
        $("#welcome-container").css({"display": "none"});
        $("#requests-container").css({"display": "inline"});
    }

    function getNonAuthContainers() {
        $("#btn-login-nav").css({"display": "inline"});
        $("#btn-logout-nav").css({"display": "none"});
        $("#welcome-container").addClass("jumbotron").css({"display": "block"});
        $("#requests-container").css({"display": "none"});
    }

    function ubAuth() {
        UB.connect({
            host: window.location.origin,
            allowSessionPersistent: true,
            onCredentialRequired: function (conn, isRepeat) {
                return isRepeat
                    ? Promise.reject(new UB.UBAbortError('invalid password or username'))
                    : customConfirm(); //if session non-autorized call customConfirm() function
            },
            onAuthorizationFail: function (reason) {
                $("#errDialog")
                    .html('<b>' + reason + '</b>')
                    .dialog({
                        resizable: true,
                        modal: true,
                        buttons: {
                            "Retry": function () {
                                $(this).dialog("close");
                                customConfirm();
                            },
                            "Cancel": function () {
                                $(this).dialog("close");
                            }
                        }
                    })
            }
        }).then(function (conn) {
            window.$conn = conn
            //Disable popup-window after F5 if session is authorized
            if ($('#popUp').hasClass('ui-dialog-content')) {
                $('#popUp').dialog("close");
            }
            getAuthContainers() //show content for autorized users
            getMyRequests()   //get requests list
        })
    }
});
In the console in the root of the project, run the webpack command:
./node_modules/.bin/webpack
As the result the app.min.js file will be created.
In the <head></head> section of index.html file,
add:
<script type="text/javascript" src="app.min.js"></script>
and remove:
<script src="/clientRequire/@unitybase/ub-pub/dist/ub-pub.min.js"></script>
because it is already included in app.min.js.
Creating a -dev version of the project #
To create the -dev version of the project perform the following steps:
- Create the
www/index-dev.htmlfile and copy the code fromindex.htmlinto it. - Change the link:
to:<script type="text/javascript" src="app.min.js"></script><script type="text/javascript" src="src/app.js"></script> - Return the link:
<script src="/clientRequire/@unitybase/ub-pub/dist/ub-pub.min.js"></script> - Remove the include of the
ub-pubmodule fromapp.js:const UB = require('@unitybase/ub-pub')
Now, at http://localhost:8881/index-dev.html, the project is available for debugging.