To configure ssh authentication with public keys follow next steps. (All commands on CentOS example)
On Linux server #
Adding User #
sudo adduser username
Give your user a password:
passwd username
Granting Privileges to a User #
If your new user should have the ability to execute commands with root (administrative) privileges, you will need to give the new user access to sudo. We can do this by adding the user to the wheel group (which gives sudo access to all of its members by default) through the gpasswd command:
sudo gpasswd -a username wheel
Don't forget add user to group which managed your service:
gpasswd groupname -a username
Configure SSH #
Login as created user:
su username
In your home dir create .ssh folder and file authorized_keys in it:
mkdir .ssh && touch .ssh/authorized_keys
You must give minimum permissions to this file and folder to ssh connection work.
Make sure only owner can write to home folder, .ssh folder and authorized_keys can be read and write only by owner.
Or you can execute this commands:
chmod g-w ~
chmod 700 ~/.ssh
chmod 600 ~/.ssh/authorized_keys
On Windows Client #
-
Install Putty-CAC on Windows client. This modified Putty version was made to support smart cards & certificates
-
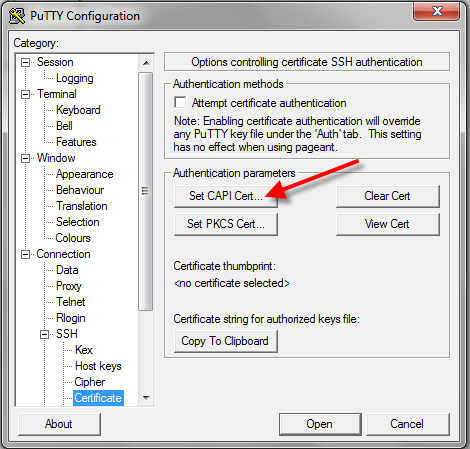
At the PuTTY Configuration window side-bar, go to Connection > SSH > Certificate. Click Set CAPI Cert….
-
At the Windows Security window, select your certificate.
-
Back at the PuTTY Configuration window, you’ll see the certificate thumbprint. Click the Copy to Clipboard button.
-
Login to server and in
.sshfolder execute:echo [paste key from clipboard] >> authorized_keysOr just put key to end
authorized_keysfile. The key will look like this:
ssh-rsa AAAAB3NzaC1yc2EAAAADAQABAAABAQCyPn2dShOF.. . CAPI:05bf4653b3098a87b67816d81049f489d5b5ffb4This command append your key to authorized_keys, and now you can login with certificate.